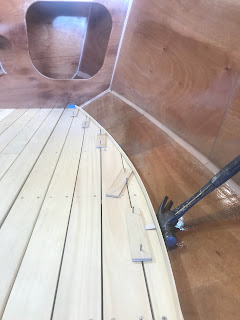
Now it's time to put a smooth curve on the outer floorboard edges and ends. A thin timber off cut is used to trace a nice sweeping pencil line. I started with the small outermost floorboard and gently pulled the thin timber off cut in towards BH 2 forward and BH 8 Aft. I used 3mm thick nails in the gaps between the floorboards to hold the thin timber in place.
Each board is removed and planed down to the line, trial fitted, edges routed round and fully sanded.
This is really nice timber to work with, I can't wait to see how the grain looks after the final finish.
Here are the finished floorboards with six access hatches cut in.
The six access hatches require some hardware so it's off to Whitworths (An Aussie ship Chandlery store).
Armed with 14 Butt hinges, 56
countersunk screws and 6 Teak
finger rings it's time to do some fitting out.
The hatches required a routed section to ensure the butt hinges are flush with the floorboards. I clamped a template made from scrap 7mm thick ply to each access hatch and routed the exact external size of the butt hinge.
Holes are drilled to secure the decorative teak finger rings and all the parts screwed together to form the hinged access hatches. Two down four to go.

Here is a video of the floorboards, next is an all-round coat of epoxy and then several layers of clear gloss finish. That should bring out the beautiful grain of the Queensland Hoop Pine.
If you find the floorboard ends
between BH8 and Floor 7 curl
up slightly due to the distance,
then...............
Screw a small piece of ply to the underside of the offending floorboard at the end and slide it under the neighboring
secured floorboard.
Thats the end of the eleventh month of construction.......


No comments:
Post a Comment