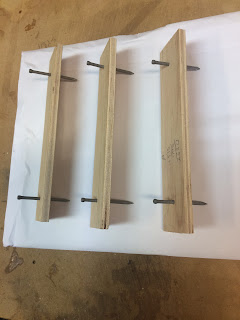
The two middle centerboards are clamped in place with spacer jigs to maintain the 3mm gap between each floorboard. The spacer jigs are constructed from strips of ply with two 3mm diam nails either end.
The boards are drilled with a countersinking bit using the location template and then screwed into place.
I used 178 X 30 mm long SS countersunk screws to secure all the floorboards. I shortened some of the screws to 25mm for the outer floorboards where the floors merge into the hull bottom.
It's time to decide where and how many access sections to build into the floorboards. Personally, I would like to be able access the entire under floor section of the hull.
Each access hatch was set up on two raised pieces of timber and separated by two spacer jigs from below. They are held together with clamps and cleats are drilled and screwed into place.
Time to rough fit the outer curved floorboards, I used the same method as Stephen on the "Eynsham PocketShip Blog" to mark the cuts where the boards meet the hull bottom, thanks Stephen. I used a plywood template that was the same width and thickness as the floorboards and long enough to sit on at least two floor frames. The 3mm gap template was placed between the template and the adjacent fixed board.
Then the template was moved up until it hit the hull, a cross was marked and then the triangular measurement was transferred onto the end of the floorboard.
For a more detailed explanation of this process check out Stephen's blog:
http://www.theeynshampocketship.co.uk/


No comments:
Post a Comment