I've had a spell from glassing the cockpit by digressing to other sections of the yacht. But I have put it off long enough, so back to laying glass cloth.
Contact Email
Sunday, December 22, 2024
Glassing the Cockpit (Cont.)
Sunday, December 8, 2024
Boom Gallows
To keep the weight down I will laminate western red cedar (which is very light timber) with hoop pine for the boom gallows. The red colored cedar will look nice laminated next to the light-colored hoop pine.
There will be a total of 11 laminations each measuring 8mm in thickness which will make the gallows strong.
I will also drill vertical holes through the laminations to further reduce weight.
An outline of the boom gallows is drawn onto a piece of scrap board and timber blocks screwed along the bottom edge to clamp the laminations in place.
Time to make some dust.
I milled this........
Into this.......
Ten of the eleven lamination strips are glued and clamped to the plastic covered clamping board.
The 11th, top strip will be glued on later after I drill the vertical holes to reduce the gallows weight.
After removing the clamps and plastic I cleaned the epoxy squeeze with a large disc sander before running the section through a thicknesser.
And here is the cleaned-up and shaped section. I rough shaped the ends with a jig saw and cleaned them up with a belt sander.
Time to drill the 25mm diam. holes for the boom gallows support tubes. I used a Forstner bit in a bench drill.
As I mentioned earlier to reduce weight, I drilled twenty-six 20mm diam. holes vertically into the gallows from the top.
I didn't weigh the section prior to drilling the holes but the section feels quite light without compromising strength. (I hope)
The top laminate is glued in place covering up the holes.
The top laminate is cleaned up, trimmed and the edges routed. Holes are drilled for rope to secure the mast. The first coat of epoxy is applied.
Sunday, December 1, 2024
Tiller Time
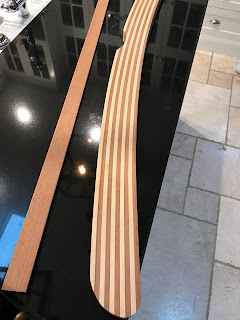
I liked the look of a laminated tiller. Using blue gum and hoop pine provided a nice contrasting color of the red colored blue gum next to the light-colored hoop pine.
The tiller plan is covered with plastic and clamping blocks screwed along the upper curve of the tiller's length.
The laminates are milled to 6.5 mm thick sections. A dry fit of the timbers is clamped in place to ensure the timber bends OK with no surprises.
The laminates are glued and clamped in place. Upper timber blocks are screwed down to ensure the sections are held down flat and prevent any twisting.
After leaving the tiller overnight I ran it through a thicknesser down to 18mm.
Edges routed next and the complete unit sanded to a smooth finish.


