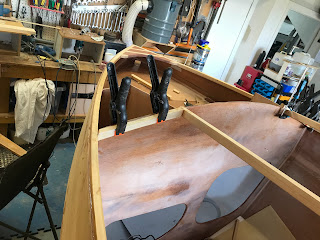
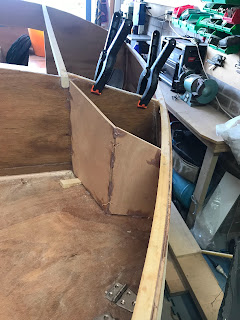
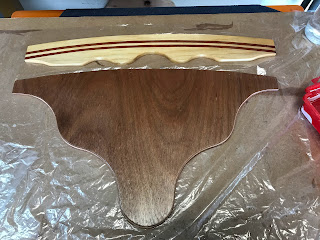
The Port Dorade Box is stitched
in place and epoxy tack welded.
The Dorade Boxes are filleted and glassed for strength.
The Dorade Box cleats are shaped and 2 pieces of 9mm ply are glued together for the backing blocks.
For additional strength I added two strips of glass tape to the inside where the backing blocks will be installed. The tape ran from BH 2 completely around the Dorade Box to the hull side.
The backing blocks are glued and temporarily screwed in place.
The last three things (hopefully) to do before installing the cabin roof which will close up the Dorade Boxes is:
1) Drill for drainage and
2) Provide waterproof access for electrical wires to connect the navigation lights and the solar panel.
3) Glue the Dorade Box cleats.
And then paint various areas.
The drainage holes are drilled out with a 25mm Forstner bit. A 25mm diameter electrical conduit is roughened up with 40 grit sandpaper and epoxied into place.
When set hard the conduit is cut off and sanded smooth leaving a smooth waterproof drainage hole from the Dorade box.
25mm conduit is also glued into the forward deck top and secured to the backing block. This will allow wiring to travel up from the electrical panel and prevent water entering the forward cabin storage area.
The cleats are glued in place.
And, a lick of paint completes the interior of the Dorade Boxes
NEXT
I decided to install 2 Butterfly Vents on BH2 for the Dorade Box ventilation.
I drew the Butterfly Vent dimensions onto a 25mm thick piece of Hoop Pine and using a Japanese saw rough cut the section.
I used a 102mm hole saw to cut the opening for the vent, remember this is still a 25mm thick piece of Hoop pine.
Using a belt sander secured in a homemade bench jig I shaped the piece.
After marking the center, I drew
a pencil line around the ring dividing the piece into two 12.5mm thick sections.
Using a Japanese saw I cut the piece into the two separate halves.
A fine rebate was routed to allow the vents to sit flush, and mounting holes drilled.
Now it's time to make it looked pretty, firstly a coat of undiluted epoxy.
After several coats of polyurethane, the unit is screwed to BH 2.
Here is a pic taken from the top of the dorade box. I intend to cover the vent with some flyscreen. Gota keep them pesty mossies, sand fly's and wasps out.
Four stirrer stickers glued together in a square for the frame and fly screen glued to the frames……simple.
Screens installed, I think that completes the Dorade box, ready for painting.
After reading previous builders posts, I'm going to strengthen the area between the upper carlins on BH2, (a high stressed area where the tabernacle secures to BH2). I intend to make it structural, functional and pleasing to the eye.
I drew a rough pencil line of the shape on BH2.
A copy of the rough line drawing from BH2 is transferred to transparent wax paper and using the curved radius of a 4lt paint tin and a compass I drew the lines with a more pleasing curve. Using carbon paper, I transferred the design onto a nice, grained piece of 9mm ply.
The three circles are where a clock, barometer and hygrometer/thermometer will be installed.
These are the instruments I will be installing.
The 9mm ply is cut and trial fitted to BH2. This piece in conjunction with the upper cabin cleat will give additional strength to BH2.
I cut the upper cleat from a solid piece of Hoop Pine and followed the curves of the instruments.
Here is the upper cleat fitted to the 9mm ply, edge routed and sanded should look very nice BUT.........I think it can be made to look nicer.
I decided to follow the laminated theme using the Blue Gum, yes more time-consuming work but it will look very nice inside the cabin.
I calculated the cuts for the laminations of alternating white Hoop Pine and Blue Gum that would evenly fill the upper cleat. This pic shows the two cuts in preparation for the lamination.
7mm thick Blue Gum strips are cut.
The sections are coated with epoxy and clamped together. A plastic sheet is placed under to prevent the piece sticking to the board.
The upper cleat will be left for 24 hrs. to set hard.
Time to clean up, I used 60 grit paper on an orbital sander.
Cleaned up in no time, looking nice.
A couple of coats of epoxy are applied before lacquering.
While waiting for the epoxy to dry I cut the two cabin top sheets from 6mm ply.
The two sheets are glued together in the middle with the butt block.
After consultation with fellow builders, I decided to strengthen the cabin top by glassing the underside. I hope it doesn't make it too stiff to bend into place.
The glass is wetted out with an overlap on the butt joint.
Trial fit of the cabin top with a couple of clamps and three ratchet straps. It seems to be a good fit, plenty of overlap and conforms well to the cabin shape.
Using the little widget tool, I marked the location of the shearclamps, cleats and BH locations. This little tool worked a treat.
The cabin top is temporarily screwed into place. I crawled inside the cabin and marked the location of the carlins, sheerclamps and cleats to the underside of the cabin roof ply.
As I am working on my own, I thought about a way to prevent the cabin top slipping and misaligning with the temporary screw holes.
So to ensure the cabin top aligns perfectly with the temporary screws holes I cut slots in the top ply adjacent to BH2 & BH3.
A piece of ply was temporarily screwed into the corner where BH2 joins the Dorade box. The piece aligned tightly with the slot cut into the cabin roof ply.
Two lengths of timbers are clamped to BH3 and tightly align with the aft slots of the cabin top. I’m now confident when I glue the cabin top down it will align perfectly with the screw holes. Well, that’s the theory……let’s see how it goes.
The top removed masked up and the first coat of polyurethane applied.
Looking good and this is only the first coat.
I also coated the carlins and cleats with polyurethane.
It’s now two years since construction commenced.


